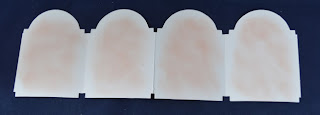
N.B. You should be able to get two from each A3 sheet of card, but you only need one for each accordion card you want to make.
2. Fold up the card, then using a Sizzix Bigz Vintage Cabinet die, place the folded cardstock so that the two vertical crease lines are inside the cut lines.
3. Run the die through a diecutting machine and you will see that the lines at the top and bottom of the die cut, but the ones on each side do not since they are outside the card!
4. Remove the card from the die, open it out and you will get the shape above.
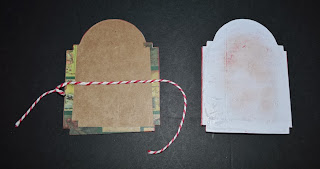
5. Now, when I make the frames for screen cards (above left), I always end up with a lot of the inside bits left over (above right). They make great masks!
6. Use cut'n'dry foam to splodge ink around the inner area of each of the panels...
7. ...and use the mask on each panel while you add darker ink to the outside to make frames.
8. You'll end up with something like this. You can repeat the process on the other side if you want, but you only need to decorate the centre two panels. Then leave the ink to dry before proceeding to the next step (you can use a heat gun to speed it up a bit if you want to!).
N.B. Use any colour combination you like, the above is Tattered Rose / Barn Door. I've switched to Broken China / Faded Jeans below.
9. Stamp the background with versamark ink and brush over with Perfect Pearls.
10. Repeat for the rest of the panels. Finish all the rest of your stamping decorating the panels however you like before moving on to the next step.
11. Next, cut two cabinets from thick card to make the covers (I use recycled packaging), and two from patterned paper. Cover one side of each thick card diecut with patterned papers, using a thin layer of PVA to adhere the patterned paper to the card.
12. Now, you can either cut two more from patterned papers and use them to decorate the other side of the covers, or you can use up some scraps and just cut the edges since these are the only bits that are seen...
13...glue them on with a thin layer of PVA and Bob's your uncle :-)
14. Cut two lengths of Baker's twine or lace about 12 to 16" long, and glue one to the inside of each cover with glossy accents.
15. Glue one of the two undecorated panels of your concertina-folded card to the inside of the front cover...
... trapping the Baker's twine inbetween the cover and the undecorated panel.
16. Glue the other undecorated panel to the back cover...
... once again trapping baker's twine between the panel and the cover. This is what it looks like viewed from the top.
16. Now add any extra embellishments to your card. The twine or lace is tied on each side to close the card once it's finished. Here's a sneak peek of tomorrow's accordion card, I hope you'll join me to see the inside!


Thank you for tutorial. It's super!
ReplyDeleteEret x
Wow thanks for the tutorial beautiful project. Love Alison xx
ReplyDeleteWow what a great tutorial :)
ReplyDeleteVic
Thanks so much for the tutorial - it is fantastic. I would like to try it but I have to ask for a favour. You have used a vintage cabinet - I do not have it, but is it possible to ask you to take a copy of the diecut and send it in a mail to me ??
ReplyDelete