I learned this technique whilst watching Sue Wilson on Create and Craft earlier this year and thought I'd do a step by step tutorial. Apparently, it's been around for a few years but I'd never come across it before and it's fun!

I used a cheap washing-up bowl from the poundshop that I keep just for this (99p) and the cheapest shaving foam I could find (26p from Sainsburys!).

1.Squirt a layer of cheap shaving foam into a clean washing up bowl, just enough to cover the base of the bowl.

2. Drip or spray ink onto the layer of foam. You can use any water-based ink. I found the concentrated Dylusions spray inks to be ideal.

N.B. You get different effects depending on which inks you use and how much you swirl. The rest of the pictures show you the results using just one colour...


4. Take a sheet of cheap white card and press it onto the foam.

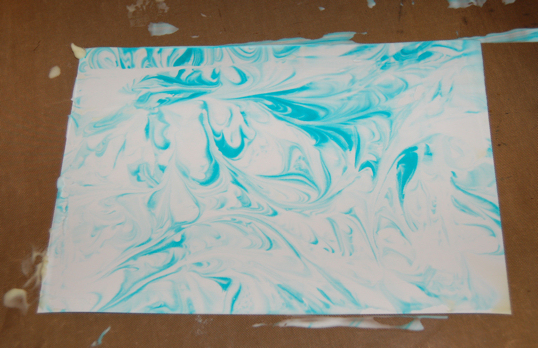
5. Remove the card from the foam and place face-up on a non-stick mat. At this point it looks a mess!

6. Use a plastic ruler to swipe the foam off the top of the card (I haven't got three hands, I asked Tom to take the photo :-)).
7. And this is the end result! It dries very quickly and is ready for overstamping in a few minutes.
N.B. you can add more ink to the shaving foam left in the bowl and keep repeating as long as you want. It's great with different colours added on subsequent visits to get more depth in the backgrounds.
The "Coincidences" card uses this simple one ink technique to make the background, which is overstamped in archival ink and coloured with distress markers. The shaving foam background leaves a fabulous coating on the card over which distress inks blend beautifully!
Here's a card that uses the two colours I started the tutorial with, which are Dylusions spray inks:

Have a great day everyone! Maddy x
Maddy, thank you! It's fun and intеresting technique!
ReplyDeleteWhat an awesome technique. Thank you, Maddy, for sharing it. I love the card what you did with it.
ReplyDeleteEret x
This card is fantastic Maddy, I love the technique too. Thane is going to love this card. Lee x
ReplyDeleteWow Maddy this is great, thanks so much for the tutorial, Alan has some shaving foam which he no longer uses as he is practicing being a scarecrow lol. Love Alison xx
ReplyDeletegreat tutorial will have to try that-sorry late hopping been in bed ill
ReplyDeletecarol x
fab tutorial & great card sue xx
ReplyDeleteI always think this is an amazing technique, Maddy and your tut is very clear. Hope you're having a great weekend, happy hopping xx
ReplyDeletevery clever technique
ReplyDeletegreat tut and fab card x
ReplyDeleteLooks great fun and when my new look craft room is not as precious I will give it a go!!!!! Thank you for sharing.
ReplyDeleteThank you for the tutorial, I hadn't seen the technique before. Great card.
ReplyDeleteWhat a fab idea, great tutorial too! Happy leapblogging! Elaine-xxx-
ReplyDeleteThat looks like messy crafting LOL. A great idea and fab tutorial. Hubby might be glad that I only have alcohol inks here at the moment and leave his shaving foam alone ...
ReplyDeleteHeike xx
this is a cool idea, do like the affect
ReplyDeletewow - this is an amazing idea fab instructions and such a brilliant effect.
ReplyDelete