"Easter Bunny Card"
I like to recycle bits of old packaging in my cards, so often use cat food & dishwasher tablet boxes when I want a bit of thick card. Strong dishwasher or washing tablet boxes are ideal for use with this technique.

"Cover Card with strong ds tape"
1. Start by cutting a piece of strong card to roughly just over 5 x 5 inches.
2. Cover with strips of strong double-sided tape. I just use the cheap, red tape that you can buy in bulk at the craft fairs. If you want to be posh, you could use sticky sheets instead.

"Die-cut Covered Card"
3. Run your card through a die-cutting machine with a steel rule die such as a Sizzix Bigz die and separate the pieces.

"Remove tape backing"
4. Carefully remove the backing from the tape, taking care not to lift the tape from the card. If you accidentally lift the tape in a small section (like I did here with the bunny's ears), you can add a bit more and cut around it with a pair of scissors before having another go.
5. Cut up small scraps of patterned card to make the mosaic tiles.

"Arrange Mosaic Tiles"
6. Arrange the pieces of mosaic, pressing them down into the sticky tape and leaving gaps in between each of the edges.

"Heat-emboss"
7. Place the prepared die-cut onto a piece of paper and sprinkle metallic embossing powder onto all the exposed areas of sticky tape.
8. Shake off excess embossing powder and return to the pot.
9. Working in a well-ventilated area, heat the embossing powder and enjoy the little miracle (I never get over this, just love watching the powder transform!).

"Second Coat"
10. Re-heat each small area in turn, quickly adding a second coat of embossing powder while the first coat is molten, then heating again to melt. In this way, you can make a thicker layer of embossing that looks more metallic. If any bits are missed, you can also use an embossing pen to stick extra powder exactly where you want it.

"Glossy Accents"
11. Repeat all the steps to cover the matching bow.
12. Add a blob of glossy accents to each of the paper tiles and allow to dry overnight.

"Finito"
13. And this is Mr. Rabbit after drying. The extra coats of metallic distress powder give the edges of the paper a round appearance and the glossy accents makes the paper look like pebbles set in gold.

"Hanging Frame"
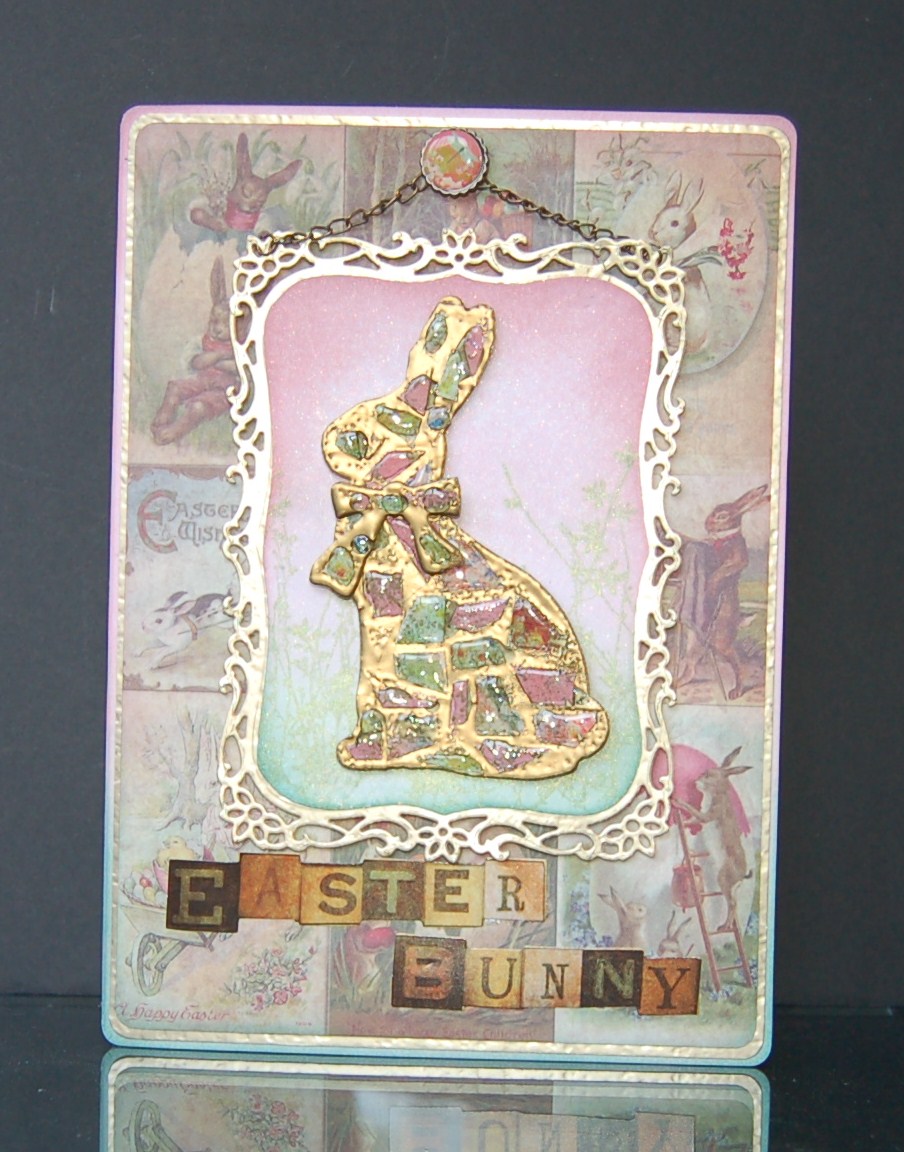
I made a quick background for the bunny with some sponged distress inks and stamping with green Perfect Pearls brushed on, then cutting to fit a frame die-cut from hammered gold cardstock. A couple of lengths of chain were fixed to the top of the frame with jump rings and attached to the card with a decorative brad. The frame and bunny were mounted with foam tape for extra dimension. The bottom layer of patterned paper was inked around the edges and matted onto more hammered gold cardstock, and finally fixed to a blank whose edges were also distressed. A Salvage Sticker sentiment was stuck at the bottom.
Ingredients for metal mosaic:
empty dishwasher tablet box
strong double-sided tape (or sheet)
steel rule die (I used Sizzix Bigz Tim Holtz' Bunny & Butterfly)
scraps of patterned paper (I used Tim Holtz Lost and Found)
metallic embossing powder (I used some old dregs of Cosmic Shimmer, it doesn't have to be pristine because any mottles and bits just make the whole thing look more realistic)
glossy accents
Ingredients for card:
metal mosaic
cardstock; white 300gsm (for card base), white 160 gsm (for inking and stamping), hammered gold 200gsm
Tim Holtz Seasonal paper stash
Tim Holtz Seasonal Salvage Stickers
Stampers Anonymous Tim Holtz stamp set: Spring Sprung
Spellbinders Decorative Labels Eight
Distress Inks: Bundled Sage, Pine Needles, Spun Sugar, Victorian Velvet
Perfect Pearls, heirloom green
chain, jump rings and decorative brad
adhesives: foam tape, PVA
Entered for the following challenge:
Simon Says Stamp and Show - Metal-ology
Cutie Pie Challenge - Pretty Pastels
Stamp and Create - Spring is Coming
Forever Friends - Animals and/or Butterflies and/or Birds
Wonderful card! At first I think that you used semi precious stone :) Natalia
ReplyDeletewow this is brilliant thank you so much for the trutorial. will certainly have to have a go. Love Alison xx
ReplyDeleteOh wow, Maddy! This is stunning! LOVE it! very inventive. I thought it was done with tile fragments until I read what you had done!
ReplyDeleteFabulous project! Thank you so much for joining us at Stamp and Create this month! Good luck and I hope to see you back next time!
ReplyDeleteRene :D
WOW!! Your are so clever Maddy. I too thought that you had used stones at first glance.
ReplyDeleteYour tutorial is so clear that even I could follow it! The finished project is stunning,
Hugs Sue
Very clever Maddy and it looks beautiful, very effective. xxx
ReplyDeleteI have never seen anything like this. Next weekend I am going to be together with some other scrappers and I will take your project and show it. Just fantastic.
ReplyDeleteThis technique looks just amazing Maddy, I've read it, re-read it and might need to come back again but I have to try out because your piece of work looks fabulous.
ReplyDeleteB x
Thanks for joining the monthly challenge at Forever Friends with your stunning project, your rabbit is beautiful. Good luck in the draw and we hope to see you again for our next challenge.
ReplyDeleteDiane x
Gorgeous bunny Mandy..Love what you have done with it...Brilliant work of art...Julieannex
ReplyDeleteOh wow, this is fabulous, clever idea
ReplyDeleteA lovely piece of work Maddy, l have never thought of putting embossing powder on ds tape. Enjoyed reading your post.
ReplyDeleteThank you for joining the Pretty Pastels challenge over at Cutie Pies and good luck x Susan x
LOVE LOVE LOVE your bunny!!! Love your Tim tech too...great step out! What a fabulous card...makes me so happy! I'd frame it! Thank you for showing us your metals at Simon Says Stamp & Show this week!
ReplyDeletegreat card and tut thanks for sharing x
ReplyDeleteVery clever, it looks great. xxxx
ReplyDeleteGorgeous card. Just hopping by.
ReplyDeleteGreat project and a fab tutorial.
ReplyDeleteoh wow what a super card izzwizz ... just love that bunny and thank you so much for taking time to show us just how it is done ... you make it look soooo easy ... just hopping about .. .have a great weekend ... happy crafting and love sandy
ReplyDeleteBeautiful!! brilliant idea, thanks for the tutorial. I would love to find the time to try this.
ReplyDeleteAnne x
Fab tutorial and love the finished bunny x
ReplyDeleteSuper tutorial - love the effect - fab card too
ReplyDeleteLinda x
Stunning card and great tutorial love the finished effect
ReplyDeletecarol x
Fabulous card and great tutorial
ReplyDeleteLorna xx
What a lovely idea and great tutorial...just popped over from DC
ReplyDeleteSharon x
Ooh this is gorgeous! Happy leapblogging, Elaine-xxx- p.s I have candy if you would like to enter http://sparklingblackrose-craftmylife.blogspot.co.uk/2012/12/new-candy.html
ReplyDeleteWow!! stunning card x
ReplyDeletefrom hoppity - DC forum
Oh so very cool! Thanks for showcasing this neat technique! Thanks so much for joining us at Simon Says Stamp and Show :)
ReplyDeleteWhat a clever idea, love the chain effect.
ReplyDeleteHere Misses, if you aren't careful, Tom will banish you to the garage to do this technique in future, lol. This looks amazing Maddy. And for all its toxic smelliness, I looks like it was well worth it. Sorry Tom.....but it looks like Maddy will have to do more of these, lol. Lee x
ReplyDeleteWhat a great card.
ReplyDeleteThank you for joining us at Cutie Pie.
Kaz.xx
Oh this is so much fun. Love how you did that bunny and the details with the gold embossing and the wall hanging design. Thanks for playing at Forever Friends monthly challenge and good luck. Hope to see you back next month for a new challenge. Bettina xx
ReplyDelete